.... အားလံုးအတြက္ မဟုတ္ခဲ့ရင္ေတာင္ တစ္စံုတစ္ရာ တစ္စံုတစ္ေယာက္အတြက္ ေႏြးေထြးတဲ့ ေကာင္းကင္ငယ္ေလး ျဖစ္ပါရေစ ....
Showing posts with label လင္းနစ္. Show all posts

Monday, September 9, 2013

Squid Access Control Lists (acls) - 01

ACL ကိုပဲျပန္ဆက္လိုက္ၾကရေအာင္ .. ပထမအေနနဲ႔ ဒီေနရာေလးမွာေဆြးေႏြးထားခဲ့ပါတယ္။
စလိုက္ရေအာင္ ဒီတစ္ခါ srcdomian, dstdomain, cache_host_domain ဆိုတဲ့ အရာသံုးခုကို ၾကည့္ရေအာင္။ဒီသံုးခုက Domain နဲ႔ပတ္သတ္ျပီးသံုးတာေတြၾကည့္ပါပဲ ။ ဒီေနရာမွာ တစ္ခုသတိထားေစခ်င္တယ္။ domain and subdomain ႏွစ္ခုၾကားကို ေသခ်ာေလး ဂရုစိုက္သင့္တယ္။ ဥပမာေအာက္မွာၾကည့္ပါ
acl ExAmple01 srcdomain mydomain.com
acl ExAmple01 srcdomain .mydomain.com
ဒီနွစ္ခုကို ေသခ်ာေလးၾကည့္ပါ ။  ပထမတစ္ခုမွာက mydomain.com ဆိုျပီးသံုးထားပါတယ္။ဒါဆို squid က သူ႔ကိုဘယ္လိုနားလည္မလည္းဆိုေတာ့ mydomain.com တစ္ခုပဲနားလည္မွာပါ။ ဒုတိယတစ္ခုျဖစ္တဲ့ .mydomain.com ကိုေတာ့ ဘယ္လိုနားလည္မလည္းဆိုေတာ့ www.mydomain.com Or mydomain.com Or mail.mydomain.com Or etc အစရွိသျဖင့္ ဘယ္ေနရာဘယ္ဒိုမိန္းကပဲျ့ဖစ္ပါေစ **.mydomain.com မွန္သမွ်ကို လက္ခံနားလည္ေပးမွာပါ။
dst နဲ႔ dstdomain မွာေတာ့ dst ဆိုတာကေတာ့ သူစစ္ေဆးမႈကိုတစ္ၾကိမ္ပဲျပဳလုပ္ျပိး dstdomain ကေတာ့ မၾကာခဏစစ္ေဆးမႈေတြျပဳလုပ္ေပးမွာပါ။ဒါေၾကာင့္ dstdomain  ကိုပဲ အသံုးျပဳဖို အၾကံျပဳထားတာကို squid ဆိုဒ္ေတြမွာ ေတြ႔ျမင္ရမွာပါ။

ident, proxy_auth နဲ႔ပတ္သက္တာေတြကေတာ့

srcdom_regex, 
dstdom_regex, 
url_regex, 
urlpath_regex,
browser, 
referer_regex, 
ident_regex, 
proxy_auth_regex,
req_mime_type, 
rep_mime_type
စတာေတြပဲျဖစ္ပါတယ္။

^http:// ဆိုတာကေတာ့ ပံုမွန္အသံုးျပဳေနက် http://. နဲ႔အစျပဳတာေတြကို ဆိုလိုတာပါ။
\.jpg$ ဆိုတာကေတာ့ .jpg ျဖစ္တဲ့ပံုဖိုင္တိုက္ေတြကို ကိုယ္စားျပဳေပးတာပါ။ ဒီေန႔ရာမွာ \ ကိုအပ္ေပးထားပါတယ္။ဘာလို႔လည္းဆိုေတာ့ \ ေနာက္က . က
အေပၚကလိုပဲ အားလံုးအတြက္ကိုယ္စားျပဳမယ့္ wildcard တစ္ခုျဖစ္လို႔ပါပဲ။
နမူနာေတြအေနနဲ႔ကေတာ့

Friday, August 23, 2013

Squid ProxY SerVer အပိုင္း-၁

ကၽြန္ေတာ္ စာမေရးျဖစ္တာ ေတာ္ေတာ္ေလးၾကာခဲ့ျပီ .. အခ်ိန္ေတြ အမ်ားၾကီး တစ္ေနရာထဲမွာ ကုန္ဆံုးသြားတာ .ခု စိတ္ကိုဒီဘက္ျပန္ပို႔ထားလုိက္ဥိးမယ္ ... စကားမ်ားၾကည့္တာ .. ဘာစလုပ္မလည္း ဆိုေတာ့ Proxy ဆာဗာမွာနာမည္ရတဲ့ Squid ဆိုတာေလးကို စမ္းၾကည့္ရေအာင္ .. ကၽြန္ေတာ္က လင္းနစ္သမားဆိုေတာ့ ISA ကိုမသံုးျဖစ္ပါဘူး ... ဒီေကာင္ေလးကိုပဲ စမ္းတာေပါ့ .. အင္းစေတာ့ေတြ ဘာေတြ ေတာ့ေက်ာ္လုိက္ေတာ့မယ္ ..Configuration ေတြကိုပဲ ေဆြးေႏြးမယ္ဗ်ာ .... စိတ္နဲ့လူနဲ႔မကပ္ျဖစ္ေနတယ္ .. (LilBb ေလးကိုသတိရ လြမ္းေနမိလို႔ ) .. ^_^ ... 
ပထမဆံုး မိမိ ဆာဗာအတြက္ Port and IP သတ္မွတ္မယ္ ျပင္မယ့္ေနရာကေတာ့ /etc/squid/squid.conf ဖိုင္ေလးပါ .. ဒီေနရာမွာတစ္ခုမွာခ်င္တာက . လုပ္ေနၾကထံူးစံအတိုင္းပါပဲ ...
ကၽြန္ေတာ္တိုအတြက္ အသက္ကယ္ေပးမယ့္ BackFile ေလးလုပ္တာပါ .... ခု squid.conf ေလးကို backup လုပ္ထားလိုက္ရေအာင္ (လိုအပ္ရင္ျပန္သံုးနိုင္ဖို႔) 

#cp /etc/squid/squid.conf /etc/squid/squid.conf.SvP

 ကဲ ဒါျပိးျပီဆိုေတာ့ စလုိက္ၾကတာေပါ့ .. အေပၚကေျပာသလိို Port နဲ႔ IP ကို သက္မွတ္ေပးမယ္

http_port 192.168.x.x:8080
icp_port 3130

icp(Internet Cache Protocol) ကေတာ့ တကယ္လုိ႕ Network မွာ multiple proxy ေတြထုိင္ၾကမယ္ ဆုိရင္ေတာ့ အသံုးျပဳပါတယ္။ 

cache_peer proxy.example.com parent 3128 0 no-query

တကယ္လုိ႕ မိမိ ISP ကယူတဲ့အင္တာနက္ဟာ proxy host and port ထည့္ရတဲ့ parent proxy မ်ိဳးဆိုရင္ အခုလို ထည့္ေပးရပါမယ္။ တကယ္လုိ႕ မိမိအင္တာနက္က တုိက္ရိုက္တန္းသံုးနုိင္တယ္ဆုိရင္ေတာ့ ဒါကုိ disable ေပးထားဖို႕ လိုပါမယ္။ ဒီေနရာမွာ proxy.example.com ေနရာမွာ မိမိ ISP က သတ္မွတ္ေပးထားတဲ့ host ကုိထည့္ရမွာျဖစ္ၿပီး 3128 ကေတာ့ ISP သတ္မွတ္ထားတဲ့ port ေပါ့။ 0 ကေတာ့ icp_port ပါ ။ မိမိက icp_port ကုိ အရင္ကတည္းက ေၾကာ္ျငာခဲ့ရင္ ဒီေနရာမွာ မိမိေၾကာ္ျငာထားသလုိ ထည့္ေပးရပါမယ္။ အေနာက္က no-query , default စသျဖင့္ အမ်ားႀကီးရွိပါတယ္။ေရးရင္ကုန္မွာမဟုတ္ပါဘူး ။ အၾကမ္းဖ်င္းေလာက္အျဖစ္ ဒီေနရာမွာ no-query သတ္္မွတ္ထားလိုက္ပါတယ္။ တကယ္လို႕ username and password ေတာင္းတဲ့အင္တာနက္ဆုိရင္ေတာ့ အခုလို ထည့္ေပးလိုက္ေပါ့။ ဒီလိုေလးျဖစ္မွာေပါ့ .. 

cache_peer 172.16.x.x parent 1234 0 login=username:password no-query

အပိုင္း ၂ ကိုေနာက္မွဆက္ေရးေတာ့မယ္ .. လူက စိတ္နဲ႔မကပ္ပဲ ဘာေတြျဖစ္ေနမွန္းကိုမသိေတာ့လို႔ .. 
အဆင္ေျပေပ်ာ္ရႊင္ပါေစ ... 

Sunday, June 30, 2013

EXPORT HTTP_PROXY

export http_proxy  ဆိုျပီး ကၽြန္ေတာ္ တို႔ Proxy Server အတြက္သံုးတဲ့ကြန္မန္႔ေလးကို သိၾကမွာပါ .. အဲမွာ တစ္ခုက ယူဆာနဲ႔ပတ္စ္၀ါဒ္ ပါထည့္မယ္ဆိုဘယ္လိုထည့္မလည္းဆိုတာေလး ေဆြးေႏြးၾကည့္ခ်င္လို႔ .. ေအာက္ကအတိုင္းေလး ယူဆာနဲ႔ပတ္စ္ကို ထည့္ေပးလုိက္ရင္
Proxy Server နဲ႔ ေကာင္းေကာင္းအလုပ္လုပ္ပါျပီ ..
export http_proxy=http://user:passwd@proxy:port/
or
export http_proxy=proxy:port/
ထားပါေတာ့
proxy userid = tharhtar
proxy userps= tharthar123
proxy ip = 192.168.10.1
proxy port = 8080
 ကိုသံုးမယ္ဆိုပါေတာ့ဗ်ာ ..
export http_proxy=http://tharhtar:tharthar123@192.168.10.1:8080/
ဒီလိုျဖစ္သြားမွာေပါ့ ..
အဆင္ေျပပါေစ .. 

Monday, March 11, 2013

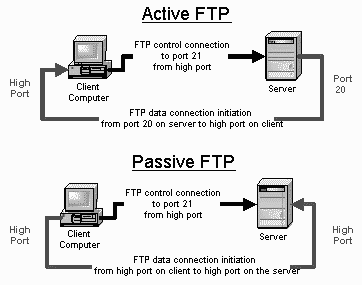
What's Active and Passive FTP


Active FTP

The sequence of events for active FTP is:

1. Your client connects to the FTP server by establishing an FTP control connection to port 21 of the server. Your commands such as 'ls' and 'get' are sent over this connection.

2. Whenever the client requests data over the control connection, the server initiates data transfer connections back to the client. The source port of these data transfer connections is always port 20 on the server, and the destination port is a high port (greater than 1024) on the client.

3. Thus the ls listing that you asked for comes back over the port 20 to high port connection, not the port 21 control connection.

FTP active mode therefore transfers data in a counter intuitive way to the TCP standard, as it selects port 20 as it's source port (not a random high port that's greater than 1024) and connects back to the client on a random high port that has been pre-negotiated on the port 21 control connection.

Active FTP may fail in cases where the client is protected from the Internet via many to one NAT (masquerading). This is because the firewall will not know which of the many servers behind it should receive the return connection.

Passive FTP

Passive FTP works differently:

1. Your client connects to the FTP server by establishing an FTP control connection to port 21 of the server. Your commands such as ls and get are sent over that connection.

2. Whenever the client requests data over the control connection, the client initiates the data transfer connections to the server. The source port of these data transfer connections is always a high port on the client with a destination port of a high port on the server.

Passive FTP should be viewed as the server never making an active attempt to connect to the client for FTP data transfers. Because client always initiates the required connections, passive FTP works better for clients protected by a firewall.

As Windows defaults to active FTP, and Linux defaults to passive, you'll probably have to accommodate both forms when deciding upon a security policy for your FTP server.

Read more: A&P FTP

Thursday, January 24, 2013

CSS Cisco 11500 Basic Load−Balancing Configuration


ကဲ ဒီတစ္ခါေတာ့ CSS loadbalancing ေလးနည္းနညး္ေလာက္ေျပာၾကည့္ရေအာင္ .. အေသးစိတ္ေတာ့မေျပာေတာ့ဘူး .. Config နမူနာေလးတစ္ခုလုပ္တာကို စမ္းၾကည့္ရေအာင္ ...
အဆင့္လိုက္ေဆာင္ရြက္မႈက ဒီအတိုင္းေလးပါ ..

Number the Circuit VLANs
Create a Service and Keepalive
Create a Content Owner
Create a Content Rule and Virtual IP Address
Add Services to a Content Rule

Bridge VLANs to Ethernet Interfaces
ဒါဆို ပထမဆံုး vlan တစ္ခုထဲကို အသံုးျပဳမယ့္ interface Ethတစ္ခုထည့္ပါ့မယ္ ..ျပီးရင္ သူအတြက္ bridge သံုးျပိး ကြန္နက္လုပ္မယ္ .. ဒီေနရာမွာ CSS ရဲ႕ Vlan default က interface ေတြ အားလံုးကိုစုစည္းထားတာပါ .. အဲ့ေတာ့ css 11500 ရဲ႕ interface e1-8 က vlan တစ္ခုထဲမွာ အရင္ကတည္းက ေပါင္း့ျပီး ရွိေနမွာပါ ..ကဲေအာက္လိုခြဲၾကည့္လုိက္မယ္ .. e2 ကို vlan10 ထဲထည့္ျပီး bridge လုပ္တာေပါ့

CSS150#config
CSS150(config)#interface e2
CSS150(config−if[e2])#bridge vlan 10

Number the Circuit VLANs
ေနာက္တစ္ခုကေတာ့ CSS loadbalancing အတြက္ အ၀င္အထြက္ port  ေတြကို လိုအပ္သလိုျပင္ဆင္လိုက္ပါ့မယ္ .. ပံုေလးနဲ႔ ယွဥ္ျပိးၾကည့္ရင္ အလြယ္တကူျမင္မွာပါ ..

CSS150#config
CSS150(config)#circuit VLAN1
CSS150(config−circuit[VLAN1])#ip address 192.168.2.10 255.255.255.0 
CSS150(config−circuit−ip[VLAN1−192.168.2.10])#exit
CSS150(config−circuit[VLAN1])#exit
CSS150(config)#circuit VLAN10
CSS150(config−circuit[VLAN10])#ip address 10.0.0.100 255.255.255.0
CSS150(config−circuit−ip[VLAN10−10.0.0.100])#

ဒါဆို

Create a Service and Keepalive
CSS150(config)#service www.myTestServer.net
Create service <www.myTestServer.net>,[y/n]:y
CSS150(config−service[www.myTestServer.net])#ip address 10.0.0.2
CSS150(config−service[www.myTestServer.net])#keepalive type ?
ftp Use FTP Keepalives for this service
http ; Use HTTP Keepalives for this service
icmp ; Use ICMP Keepalives for this service ( default )
named &nbs p; Name of keepalive to use.
none ; Disable keepalive for this service
script &nb sp; Use SCRIPT Keepalives for this service
tcp Use TCP Keepalives for this service
CSS150(config−service[www.myTestServer.net])#keepalive type http
CSS150(config−service[www.myTestServer.net])#active

Thursday, January 10, 2013

Run as root user for VLC or Google-Chrome !! without hexedit


ဒီေနရာေလးမွာ Google-Chrome & VLC player install ကိုေရးခဲ့ျပီးပါ့ျပီ .
ဒီေနရာေလးမွာေတာ့ သူတို႔ကို hexedit  သံုးျပိးျပင္ျပေပးခဲ့ပါတယ္ 
ဒီေနရာေလးမွာေတာ့ hexedit  ကိုသံုးျပထားခဲ့ပါတယ္

ခု ဒီေနရာေလးကေတာ့ hexedit  မပါပဲျပင္ဖို႔အတြက္ပါ .. ကဲေအာက္မွာစလုိက္ရေအာင္
ဒါကေတာ့ ျပင္မယ့္ script ေပါ့

nano /usr/bin/google-chrome

ေျပာင္းေပးလုိက္ပါ ဒီလိုေလး ... ေနာက္ကေနထည့္ေပးတယ္ဆိုပိုမွန္ပါ့မယ္ .. စစ္ၾကည့္ပါ ေအာက္က ကုဒ္ေလးကို

exec -a "$0" "$HERE/chrome" "$@" --user-data-dir

ျပန္ဖြင့္ၾကည့္ပါ ... အားလ့ုးအဆင္ေျပနိုင္ပါေစ

Monday, January 7, 2013

Forgot password Or Recover MySQL Root Password


MySQL root Password ပတ္စ္၀ါဒ့္ေမ့သြားတဲ့အခါျပန္ျပီးေခၚရေအာင္ ျပင္ရေအာင္
အဆင့္ ငါးဆင့္နဲ႔ သြားလိုက္ရေအာင္
ပထမ mysql ကို stop လိုက္ပါမယ္
# /etc/init.d/mysql stop

ဒုတိယ ကေတာ့ sql ထဲကို၀င္ဖို႔အတြက္ table grant ကို ေက်ာ္မယ့္အဆင့္ပါ
# mysqld_safe --skip-grant-tables &

တတိယ ကေတာ့ sql server ထဲကို၀င္ပါမယ္
# mysql -u root

ေရာက္သြားျပီဆိုရင္ ေအာ္ကမွာေပးထားတဲ့အတိုင္း ပါတ္စ္၀ါဒ္ခ်ိန္းပါ့မယ္
mysql>
mysql> use mysql;
mysql> update user set password=PASSWORD("YOUR_PASSWDအသစ္ေပးမယ့္ ပတ္စ္၀ါဒ့္") where User='root';
mysql> flush privileges;
mysql> quit

အဲဒါျပီးရင္ေတာ့ ျပန္၀င္ၾကည့္ရေအာင္
# mysql -u root -p
Enter password:
Welcome to the MySQL monitor.  Commands end with ; or \g.
Your MySQL connection id is 3
Server version: 5.1.66 Source distribution

Copyright (c) 2000, 2012, Oracle and/or its affiliates. All rights reserved.

Oracle is a registered trademark of Oracle Corporation and/or its
affiliates. Other names may be trademarks of their respective
owners.

Type 'help;' or '\h' for help. Type '\c' to clear the current input statement.

mysql>

ေနာက္ဆံုးေတာ့ sql ေလးျပန္ start ေပးထားလိုက္တာေပါ့ ..

# /etc/init.d/mysql start

Tuesday, January 1, 2013

Temporary failure in name resolution: mod_unique_id: unable to find IPv4 address of "YOURDOMAIN"


ဒီလိုမ်ိဲဳးျဖစ္တာကိုတစ္ခါတစ္ရံၾကံဳရမွာပါ

[XXX@XXXXX ~]# tail  /var/log/httpd/error_log -F
Configuration Failed
[Wed Jan 02 13:48:55 2013] [notice] suEXEC mechanism enabled (wrapper: /usr/sbin/suexec)
[Wed Jan 02 13:48:55 2013] [alert] (EAI 3)Temporary failure in name resolution: mod_unique_id: unable to find IPv4 address of "YOURDOMAIN"
Configuration Failed
[Wed Jan 02 13:48:56 2013] [notice] suEXEC mechanism enabled (wrapper: /usr/sbin/suexec)
[Wed Jan 02 13:48:56 2013] [alert] (EAI 3)Temporary failure in name resolution: mod_unique_id: unable to find IPv4 address of "YOURDOMAIN"
Configuration Failed
[Wed Jan 02 13:49:23 2013] [notice] suEXEC mechanism enabled (wrapper: /usr/sbin/suexec)
[Wed Jan 02 13:49:23 2013] [alert] (EAI 3)Temporary failure in name resolution: mod_unique_id: unable to find IPv4 address of "YOURDOMAIN"
Configuration Failed

အရင္ဆံုး ေအာက္က ကြန္မန္းနဲ႔ ဘာေပးလည္းဆိုတာၾကည့္လိုက္ပါ
# hostname
ျပီးရင္ ဒီေနရာမွာသြားစစ္ျပီး မရွိေသးရင္ထည့္ေပးလိုက္ပါ
#cat /etc/hosts
127.0.0.1   localhost localhost.localdomain localhost4 localhost4.localdomain4
::1         localhost localhost.localdomain localhost6 localhost6.localdomain6
11.22.33.44 YOURHOSTNAME WWW.YOURHOSTNAME

ခုလိုမ်ိဳးေပါ့ .. အဲဒါျပိးရင္ေတာ့
# /etc/init.d/httpd restart
Stopping httpd:                                            [  OK  ]
Starting httpd:                                              [  OK  ]

အားလ့ုးအဆင္ေျပပါေစ

Friday, December 14, 2012

Sql-Database Import to phpMyadmin fix error -> maximun limit && Script timeout passed, if you want to finish import, please resubmit same file and import will resume

ဒီတစ္ခါကေတာ့ ကၽြန္ေတာ္တို႔ phpMyadmin  မွာ database-Sqlကို import လုပ္တဲ့အခါ upload limit ကိုေက်ာ္သြားနိုင္ေလာက္တဲ့ MB အထိျဖစ္ေနလို႔ ခြင့္မျပဳနုိင္တဲ့ Error ေလးပါ . ကၽြန္ေတာ္တင္ခ်င္တာက 200MB ဗ်ာ .. ဒါေပမယ့္ သူ႔ Default သက္မွတ္ထားတာက 2MB ထဲဗ် .... အဲ့ဒါကို ျပင္ေပးနိုင္မွ အဆင္ေျပမွာပါ . ကဲျပင္ၾကည့္ရေအာင္ .. Apahce ရဲ႕ php.ini ဖိုင္က ဒီေနရာေလးေတြမွာ ျပင္မယ္ ..

upload_max_filesize=2M
post_max_size=2M
memory_limit=128M (လိုအပ္မွ ဒီလစ္မစ္ကိုေျပာင္းပါ ကၽြန္ေတာ္ကေတာ့ မေျပာင္းဘူး ( ^ _^ )

အခုလိုမ်ိဳးေျပာင္းေပးလိုက္မယ္ ..

upload_max_filesize=300M
post_max_size=300M
memory_limit=910M

ျပီးရင္ လုပ္ေနက်အတိုင္း
/etc/init.d/mysqld restart OR service mysqld restart
/etc/init.d/httpd restart OR service httpd restart ေပါ့ဗ်ာ ..

ေအာ္ ေနာ္ကတစ္ခုရွိေသးတယ္ဗ် .. ကၽြန္ေတာ္တို ခုလို import လုပ္္တဲ့အခါမွာ အခ်ိန္ဆိုတာပါေသးတယ္ဗ် .. သူက upload time limit လို႔ပဲေျပာရမလားမသိဘူး ..ခုလို 200MB ေလာက္ ထည့္တဲ့အခါက်ေတာ့ အခ်ိန္က အနည္းဆံုး ၈ မိနစ္ေလာက္သြားၾကာတယ္ဆိုေတာ့ လက္မခံေတာ့ဘူး ဆာဗာက . အဲဒီအခ်ိန္

Script timeout passed, if you want to finish import, please resubmit same file and import will resume

ဒီလို Error mesage ေလးေပးတတ္ပါတယ္ ..စိတ္မပူပါနဲ႔ အဲဒါလည္းရွင္းၾကည့္ၾကမယ္ ..ေအာက္မွာပါ ..
php.ini ထဲက ဒီအခ်ိန္ေလးကိုျပင္မယ္ ..
max_execution_time=6000

ျပီးေတာ့ phpMyAdmin ရဲ႕ config.default.php (phpMyAdmin\libraries\config.default.php) ထဲက ဒီအခ်ိန္ကန္႔သက္ခ်က္ကိုလည္းျပင္ေပးမယ္

$cfg['ExecTimeLimit'] = 300 -- ကို
$cfg['ExecTimeLimit'] = 0 (0 ဆိုတာကေတာ့ No Limit ) ကိုေျပာတာပါ

ေအာက္ကလိုေလးျဖစ္သြားမွာေပါ့

/**
 * maximum execution time in seconds (0 for no limit)
 *
 * @global integer $cfg['ExecTimeLimit']
 */
$cfg['ExecTimeLimit'] = 0;

ျပီးရင္ လုပ္ေနက်အတိုင္း

/etc/init.d/httpd restart OR service httpd restart
/etc/init.d/mysqld restart OR service mysqld restart ေပါ့ဗ်ာ ..
ဒီေနရာမွာ sql ကိုပါ restart  လုပ္ေပးရမယ္ေနာ္ .. သူ႔ကိုျပင္ထားတာဆိုေတာ့ .. အားလံုးအဆင္ေျပပါေစ

Friday, December 7, 2012

Install Vlc player and Google-Chrome in CentOS 6


ဒါကေတာ့ စတင္ျပင္ဆင္တာေပါ့ဗ်ာ ... ( ^_^ ) .....
တာမင္နယ္ကေန ခုလိုမ်ိဳးအသက္သြင္းလုိက္မယ္ .

## 32-bit ##
rpm -Uvh http://dl.atrpms.net/el6-i386/atrpms/stable/atrpms-repo-6-5.el6.i686.rpm

## 64-bit ##
rpm -Uvh http://dl.atrpms.net/el6-x86_64/atrpms/stable/atrpms-repo-6-5.el6.x86_64.rpm

ကဲ အင္စေတာ့ကို ကြန္းမန္းေလးနဲ႔လုပ္လုိက္ေတာ့မယ္ ..

## For Install VLC Media Player

yum --enablerepo=atrpms-testing install vlc

## If you have epel repo enabled, then disable it ##
yum --disablerepo=epel --enablerepo=atrpms-testing install vlc

ေနာက္တစ္ခုကေတာ့ Google-chrome အတြက္ပါ .. သူကေတာ့ အရင္ဆံုး config တစ္ခုထည့္ေပးရမယ္  ..ဒီေအာက္ေလးမွာ ေအာက္ကအတိုင္းထည့္ေပးလိုက္ပါ ...  /etc/yum.repos.d/google-chrome.repo

... google-chrome.repo ဆိုတာ ကိုယ္တိုင္တည္ေဆာက္ေပးရမယ့္ Config ေနာ္ ..

    [google-chrome]
    name=google-chrome
    baseurl=http://dl.google.com/linux/chrome/rpm/stable/i386/
    gpgkey=https://dl-ssl.google.com/linux/linux_signing_key.pub
    enabled=1
    gpgcheck=1

ျပီးရင္ေတာ့ ထံုးစံအတိုင္း အင္စေတာ့ကြန္းမန္ေလးပါပဲ ..

yum install google-chrome-stable

.. အားလံုးအဆင္ေျပႏိုင္ပါေစ ...

Monday, November 26, 2012

No space left on device: Couldn't create accept lock (/etc/httpd/logs/accept.lock.xxxx) Error in apache {start/stop/restart}

တစ္ခါဗ်ာ ..ကၽြန္ေတာ္တို႔ ေအာက္ကလိုမ်ိဳးအဲယာေတြ ေျပာျပိးေတာ ့ရန္းေနတဲ့ Apache က ရပ္လိုမရေတာ့ဘူး .. အဲဒီအခါမ်ိုးဆိုရင္ လြယ္ပါတယ္ .. ေအာက္ကလိုမ်ိဳးတစ္ေၾကာင္းတည္းေသာ ကြန္းမန္႔ေလးနဲ႔ အဆင္ေျပနိုင္ၾကပါေစ .. (ခုမွ လြယ္တာ ..ျဖစ္တုန္းက ဘာမွန္းကိုမသိလို ရြာပ်က္ေနတယ္ ((^ _ ^))
======================= ။ ==============================
tail -f /var/log/httpd/error_log
[Sat Nov 24 21:21:16 2012] [notice] Digest: done
[Sat Nov 24 21:21:16 2012] [warn] mod_wsgi: Compiled for Python/2.6.2.
[Sat Nov 24 21:21:16 2012] [warn] mod_wsgi: Runtime using Python/2.6.6.
[Sat Nov 24 21:21:16 2012] [emerg] (28)No space left on device: Couldn't create accept lock (/etc/httpd/logs/accept.lock.22001) (5)
[Sat Nov 24 21:21:59 2012] [notice] suEXEC mechanism enabled (wrapper: /usr/sbin/suexec)
[Sat Nov 24 21:21:59 2012] [notice] Digest: generating secret for digest authentication ...
[Sat Nov 24 21:21:59 2012] [notice] Digest: done
[Sat Nov 24 21:21:59 2012] [warn] mod_wsgi: Compiled for Python/2.6.2.
[Sat Nov 24 21:21:59 2012] [warn] mod_wsgi: Runtime using Python/2.6.6.
[Sat Nov 24 21:21:59 2012] [emerg] (28)No space left on device: Couldn't create accept lock (/etc/httpd/logs/accept.lock.22017) (5)
=================== This Error ============================

ဒီကြန္မန္းေလးကေတာ့ အေျဖကိုေကာင္းေအာင္ျပင္ေပးမွာပါ  --->>

ipcs -s | grep apache | awk ' { print $2 } ' | xargs ipcrm sem

Thursday, October 25, 2012

Using vi as a hex editor

hexedit လိုမ်ိုးေတြ မသြင္းထားလို့ hexadecimal value ေတြကိုဘယ္လိုခ်ိန္းမလည္း ...
ကဲ ဘာနဲသံုးရမွန္းမသိလို စိတ္ညစ္မေနနဲ သူ့မွာပါျပီးသား Vi editor ရွိပါတယ္ ..ဘယ္လိုလုပ္မလည္းဆိုတာ ေအာက္မွာေျပာျပထားပါတယ္ ..
ပထမ  vi editor ကိုဖြင့္မယ္ေပါ့ဗ်ာ
သူက ေပာ္လာပါလိမ့္မယ္ ေပါက္တက္ကရေတြနဲ့ ဘာလို့လည္းဆိုေတာ့ သူနားမလည္တဲ့ value ေတြကိုးး ... ဒါအလြယ္ေလးပါ ... ကြန္မန္းေလးေတာက္ေပးလိုက္မယ္ ထံုးစံအတိုင္း ..
esc ကေနတစ္ဆင့္ ::%!xxd ဆိုျပီး Enter ကိုသာ ရဲရဲေခါက္ခ်လိုက္ ေတြပါလိမ့္မယ္ .. hex value ေတြကို .. ကဲ ျပင္ေပေတာ့ .. အရင္ hexedit ကိုသံုးဖူးသားသူေတြကေတာ့ ၀မ္းသာျကမွာပါ . မသံုးဖူးေသးတဲ့သူေတြလညး္ help ကိုဖတ္ျပီး သံုးျကည့္ေပါ့ .. ေကာင္းလိုက္တဲ့ VI Editor ျကိုက္သြားျပီ ... ေအာက္မွာ ပိုရွင္းသြားေအာင္ ပံုေလးေတြနဲ ျပေပးလိုက္တယ္ ...
  vi နဲဖြင့္လိုက္ျပီ

vi ကို hexeditor ျဖစ္ေအာင္ေျပာင္းမယ္ .. ကြန္မန္းတိုက္ေနရာ ေအာက္ဆံုးမွာ ကြန္မန္းေရးျပထားတယ္
:%!xxd 

ေျပာင္းသြားျပီ .. ျပင္ျကမယ္ ..

 ျပင္ျပိးသြားျပီ ျပန္ထြက္မယ္ .. ေအာက္ဆံုးကြန္မန္းတိုက္မွာ :%!xxd -r ဆိုျပီး ျပန္ထြက္သြားမယ္

ကဲ မူလအတိုင္းျပန္ျဖစ္ေတာ့ ပိတ္လိုက္တာေပါ့ဗ်ာ .. Vi ကို .. :wq ဆိုျပီးေတာ့ ..

အားလံုးအဆင္ေျပျကပါေစ ...

Friday, October 12, 2012

usb read-only file system in Linux

ေအာက္ကအတိုင္းေလးေပါ့ဗ်ာ ..

root@bt:/# cd /media/SVP/
root@bt:/media/SVP# mkdir m
mkdir: cannot create directory `m': Read-only file system

/media/SVP/forwkh': Read-only file system
/media/SVP/mbstring.txt': Read-only file system

root@bt:/media/SVP#mount
/dev/sda7 on / type ext4 (rw,errors=remount-ro)
proc on /proc type proc (rw,noexec,nosuid,nodev)
none on /sys type sysfs (rw,noexec,nosuid,nodev)
none on /sys/fs/fuse/connections type fusectl (rw)
none on /sys/kernel/debug type debugfs (rw)
none on /sys/kernel/security type securityfs (rw)
none on /dev type devtmpfs (rw,mode=0755)
none on /dev/pts type devpts (rw,noexec,nosuid,gid=5,mode=0620)
none on /dev/shm type tmpfs (rw,nosuid,nodev)
none on /var/run type tmpfs (rw,nosuid,mode=0755)
none on /var/lock type tmpfs (rw,noexec,nosuid,nodev)
none on /lib/init/rw type tmpfs (rw,nosuid,mode=0755)
/dev/sdc on /media/SVP type vfat (rw,nosuid,nodev,uhelper=udisks,uid=0,gid=0,shortname=mixed,dmask=0077,utf8=1,flush)
လာတပ္တဲ့ usb flash drive အကုန္လံုးကို အေပာ္ကလို Read-Only ပဲေျပာေနေတာ့တာပဲ.
ဘာလုပ္ျကမလည္း... လြယ္ပါတယ္မဟုတ္ဘူ .. ေတာ္ေတာ္ေလးကို ေမြွလိုက္ရတယ္ ..မသိေတာ့လည္း ဒီလိုပဲေပါ့ ..ေနာက္ေတာ့မွ ကြန္းမန္တစ္ေျကာင္းတည္းနဲအိုေကမွာ စိုေျပသြားတယ္ . ေအာက္ကလိုေလလုပ္ျကည့္လိုက္မယ္

Tuesday, October 2, 2012

Fun App ONEKO . CAt-and-mouse point


ကဲ ONEKO တဲ့ဗ်ာ .. အလန္းေလးေတြ သေဘာက်တယ္ဆိုရင္ေတာ့
စမ္းျကည့္ေစခ်င္တယ္.. ေအာက္မွာအရိုးရွင္းဆံုး နမူနာေပးထားပါတယ္ ..
ျကည့္ဖိုအဆင္မေျပတ့ဲ ကြန္မေကာင္းသူေတြအတြက္ကေတာ့ ေအာက္မွာ
သံုးပံုကိုေျပာျပထားပါတယ္ ..

root@bt:~# apt-get install oneko //သြင္းမယ္

root@bt:~# oneko  //သံုမယ္ ေျကာင္ေလးတစ္ေကာင္ေမာက္စ္ေနာက္ကိုလိုက္ျပီး ဖမ္းေနပါလိမ့္မယ္ ..  (( ^ _ ^ )) ..

root@bt:~# man oneko // အသံုးျပုဖိုပိုလိုေကာင္းေအာင္ ဘာေတြ လုပ္လိုရလည္းဆိုတာ သြားဖတ္ျကည့္မယ္

root@bt:~# oneko -dog //ဒါဆို ေခြးေလးတစ္ေကာင္ေရာက္လာျပီး ေမာက္စ္သြားရာေနာ္က တစ္ေကာက္ေကာက္လိုက္ေနပါလိမ့္မယ္


Monday, October 1, 2012

rpc.statd is not running : MounT ErroR


ေမာင့္လုပ္တဲ့အခါ ေအာက္ကအတိုင္းေလး Error တက္လာရင္

root@bt:/home/Svp# mount xxxx/xxx /mnt/xxx
mount.nfs: rpc.statd is not running but is required for remote locking.
mount.nfs: Either use '-o nolock' to keep locks local, or start statd.
root@bt:/home/Svp#

ေအာက္ကအတိုင္းေလး ရွင္းေလးလိုက္မယ္

root@bt:/home/Svp# service statd start
statd start/running, process 2145
root@bt:/home/Svp#
root@bt:/home/Svp# mount xxxx/xxx /mnt/xxx
root@bt:/home/Svp#

အားလံုးအဆင္ေျပပါေစ ...

Saturday, September 22, 2012

Run as root user for VLC or Google-Chrome !!


တစ္ခါတစ္ေလ ဗ်ာ .. ကၽြန္ေတာ္တို႔ လင္းနစ္မွာ vlc or google-chrome ကိုတင္ျပီးေတာ့ root ကေန ဖြင့္မရတာေတြ ျဖစ္တတ္ပါတယ္ ... အဲ့ဒီအခါမွာေတာ့ ခုလိုမ်ိဳး သူ႕ရဲ႕  /usr/bin/ ေအာက္က config ကို့ျပင္ေပးလုိက္ရင္ အဆင္ေျပသြားမွာပါ .. စမ္းၾကည့္ၾကေပါ့ ဒီေနရာေလးကေန ဒီလိုေလးျပင္ေပးလိုက္ပါ
 #hexedit /usr/bin/vlc
အဲဒီမွာ ေတြရမွာကေတာ့ hexe coding ေတြပါ အဲဒါကိုမွ ေအာက္ကေပးထားတဲ့ ေနရာကိုရွာျပိးေတာ့ ျပင္ေပးလိုက္ပါ ..
geteuid._libc_start_man ကို getppid.libc_start_man ဒီလိုျပင္ေပးျပီး save လုပ္လုိက္ရင္ အိုေကပါျပီ ..
အားလံုးအဆင္ေျပပါေစ ..

Thursday, September 6, 2012

Error Mounting : enable to mount NTFS in CentOS

mount ntfs error တက္ျပီဆိုရင္ ဒီေအာက္ကအတိုင္းေလး လုပ္ေပးလိုက္ပါ ...

[root@SvP sandviper]# rpm -Uvh http://dl.fedoraproject.org/pub/epel/6/i386/epel-release-6-7.noarch.rpm

[root@SvP sandviper]# yum install dkms ntfs-3g


Additional pkgs   
dkms   
ntfs-3g   
အဆင္ေျပနိုင္ျကပါေစ

Wednesday, September 5, 2012

Change To Default Color in BashShelL

ဒါကေတာ့ ကြ်န္ေတာ္တို့ လင္းနစ္မွာပါလာတဲ့ သူ့မူရင္း default ကာလာကိုေျပာင္းျပီးျကည့္ဖိုအတြက္ပါ ထားပါေတာ့ နမူနာအေနနဲ လင္းနစ္မွာ rwx (script,exe lib) ပါမစ္ဖိုင္ေတြဆို အစိမ္းေရာင္ နဲ့အနီေ၇ာင္.  Directory ဆိုရင္ အျပာေရာင္, text,normal ဆိုရင္ အျဖူေရာင္ . အစရွိသည္ေပါ့ဗ်ာ. အဲ တစ္ခ်ိဳ႔ေတြမွာ ျဖစ္ပါတယ္ .. မူရင္းကိုက အျဖူေရာင္ကာလာ တစ္ခုပဲပါလာတာပါ ..ဘယ္လိုဖိုင္အမ်ိုးစားပဲျဖစ္ေနပါေစ . ls ေခါက္ျကည့္ရင္  အျဖူပဲေပၚေနမွာပါ ဒါဆို ဘယ္ဖိုင္ဘာဆိုတာကို အလြယ္တစ္ကူ မခြဲနိုင္ျဖစ္ေန တတ္ပါတယ္.. ဒါေၾကာင့္ အခုလိုေျပာင္းေပးလုိက္ရင္ လင္းနစ္ရဲ႕ ကာလာေလးေတြ ျပန္ေပၚလာပါလိမ့္မယ္ 

ပထမအဆင့္အေနနဲ႔ ေအာက္ကအတိုင္း ၀င္ျပီးျပင္ပါ့မယ္ 

root@SvP:/# dircolors -p > ~/.dircolorsrc 

ေနာက္ျပီး /root ေအာက္ကို၀င္ျပင္မယ္ ဒီလိုေလးေပးလိုက္မယ္

root@SvP:/# vi /root/.dircolorsrc 

#NORMAL 00 # no color code at all
#FILE 00 # regular file: use no color at all
RESET 0 # reset to "normal" color
DIR 01;34 # directory  ---> change no:
LINK 01;36 # symbolic link. (If you set this to 'target' instead of a
 # numerical value, the color is as for the file pointed to.)
MULTIHARDLINK 00 # regular file with more than one link

ေနာက္တစ္ဆင့္အေနနဲ့ /root/.bashrc ဒီကို၀င္ျပင္မယ္ .. ဒါကေတာ့ ခုနကျပင္ထားတဲ့ကာလာကိုဖတ္ဖို့ပါ

root@SvP:/# vi /root/.bashrc 

# ~/.bashrc: executed by bash(1) for non-login shells.

# You may uncomment the following lines if you want `ls' to be colorized:
export LS_OPTIONS='--color=auto' ကြန္မန့္ေတြျဖုတ္လိုက္ပါတယ္
eval "`dircolors -b ~/.dircolors`" ကြန္မန့္ေတြျဖုတ္လိုက္ပါတယ္
alias ls='ls $LS_OPTIONS' ကြန္မန့္ေတြျဖုတ္လိုက္ပါတယ္
alias ll='ls $LS_OPTIONS -l' ကြန္မန့္ေတြျဖုတ္လိုက္ပါတယ္
alias l='ls $LS_OPTIONS -lA' ကြန္မန့္ေတြျဖုတ္လိုက္ပါတယ္
#
# Some more alias to avoid making mistakes:
# alias rm='rm -i'
# alias cp='cp -i'
# alias mv='mv -i'

ျပီးရင္ေတာ့ တာမင္နယ္ကိုပိတ္ျပီးျပန္ဖြင့္ ls ေခါက္ျကည့္တာနဲ ခုနကနဲမတူတဲ့ လင္းနစ္ကာလာေလးေတြကိုျမင္ရမွာပါ.

Saturday, September 1, 2012

THE PASSWRD FOR DEFAULT TO UNLOCK ERROR !


The application Network-manager Applet(/usr/bin/nm-applet ) wants aaccess to the default keyring , but it is block

ဒီလိုအဲယာေလးတက္လာျပီ ဆိုရင္ေတာ့ .. ဒါေသခ်ာပါတယ္ .. ပတ္စ္၀ါဒ့္ေျပာင္းထားလိုဆိုျပီးယူဆနိုင္ပါတယ္ .. ေျဖရွင္းဖိုကလည္း အလြယ္ေလးပါ .. ေအာက္ကအတိုင္းသြားလုိက္မယ္ .

Applications ---->
Accessories ----->
Password & encryption key ကို၀င္မယ္ ..
အဲဒီကမွ  password tab ကိုဆက္သြားျပီး password : login မွာ right click ေပးျပိး  change password ကေနမွတဆင့္ ပတ္စ္ခ်ိန္းပါမယ္. ဒီေနရမွာ old password ဆိုတာ မေျပာင္းခင္ပတ္စ္၀ါဒ့္နဲ၌ new password ဆိုတာကေတာ့ မိမိေျပာ္ငးထားျပီးျဖစ္တဲ့ ပတ္စ္၀ါဒ့္ကို ထည့္ေပးလို္က္ပါ ဒါဆို အိုေကပါျပီ
အားလံုးအဆင္ေျပပါေစ ..

Sunday, August 26, 2012

MySql Master to Master Replication on CentOS


ဒါကေတာ့ sql replication ကို master to master လုပ္မွာျဖစ္ပါတယ္ . နမူနာအေနနဲ႔ ဆာဗာ ၁ နဲ႔ ၂ ဆိုျပီး စမ္းလုပ္ၾကည့္ရေအာင္

Master 1 IP Address : 172.168.0.1
Master 2 IP Address: 172.168.0.2
Database to replicate: db1, db2, and db3

ဒီနမူနာကို စမ္းမယ္သူအေနနဲ႔ လိုအပ္တဲ့ SQL ကိုသြင္းျပီးသားျဖစ္ေနေလာက္မွာပါ .. မရွိေသးရင္လည္းသြင္းလိုက္ျပီး ပါတ္စ္၀ါဒ့္တစ္ခါတည္းသက္မွတ္ေပးလိုက္ပါ ..

#yum install mysql mysql-server
#mysqladmin -u root password new_mysql_password

ေအာက္ကအဆင့္ေတြကေတာ့ ဆာဗာ ၂ ခုလံုးမွာ လုပ္မွာပါ .. ဆာဗာ ၁ ဆိုရင္ ဆာဗာ ၁ မွာ သံုးမယ့္ ကြန္မန္းလိုင္းေတြျဖစ္ျပီး ဆာဗာ ၂ ဆိုရင္ေတာ့  ၂ေအာက္မွာသံုးမွာပါ ..
ပထမဆံုးအေနနဲ႔ ဆာဗာ ၂ ခုလံုးရဲ႕ /var/log ေအာက္မွာ mysql ကိုတည္ေဆာက္ေပးျပီး owner ကိုလည္း mysql ဆိုျပီး ခ်ိန္းေပးထားလိုက္ပါ

#mkdir /var/log/mysql
#chown apache:apache /var/log/mysql

ွခု ဆာဗာ ၁ ကေနစရေအာင္
sql ထဲ၀င္မယ္ ျပီးရင္ေအာက္ကအတိုင္းဆက္သြားလိုက္မယ္ ကြန္မန္႔ေတြ ဖတ္ရင္ သံုးရင္းနားလည္လိမ့္မယ္ထင္လို႔ တစ္ခုခ်င္းမရွင္းေတာ့ပါဘူး .. လိုအပ္ရင္ေတာ့ ျပန္ေမးလို႔ရပါတယ္ .. ( ^_^ )..
#mysql -u root -p
Enter Password:
mysql> CREATE USER 'slave_user'@'172.168.0.2' IDENTIFIED BY 'password';
Query OK, 0 rows affected (0.00 sec)
mysql> GRANT REPLICATION SLAVE ON *.* TO 'slave_user'@'172.168.0.2' IDENTIFIED BY 'password';
Query OK, 0 rows affected (0.00 sec)
mysql> FLUSH PRIVILEGES;

ဆာဗာ ၂ မွာလည္း အလားတူပဲသက္မွတ္ပါ့မယ္ ..

#mysql -u root -p
Enter Password:
mysql> CREATE USER 'slave_user'@'172.168.0.1' IDENTIFIED BY 'password';
Query OK, 0 rows affected (0.00 sec)
mysql> GRANT REPLICATION SLAVE ON *.* TO 'slave_user'@'172.168.0.1' IDENTIFIED BY 'password';
Query OK, 0 rows affected (0.00 sec)
mysql> FLUSH PRIVILEGES;

ဒါဆိုရင္ မာစတာအတြက္ လိုအပ္တာေတြျပင္ျပီးပါျပိ ခု SLAVE အတြက္ လုပ္ပါ့မယ္ .. အဲဒါမတိုင္ခင္ sql config အရင္လုပ္ပါမယ္ . လုပ္မယ့္ ေနရာကေတာ့ /etc/my.cnf ဆိုတဲ့ configuration မွာပါ ..

ဆာဗာ ၁ ရဲ႕ /etc/my.cnf မွာေအာက္ကအတို္င္းထည့္ေပးမယ္.

server-id = 1
master-host =172.168.0.2
master-user = slave_user
master-password = password
master-connect-retry = 60
slave-net-timeout = 60
replicate-do-db = db1
replicate-do-db = db2
replicate-do-db = db3

log-bin = /var/log/mysql/mysql-bin.log
log-bin-index = /var/log/mysql/master-log-bin.index
binlog-do-db = db1
binlog-do-db = db2
binlog-do-db = db3

relay-log = /var/lib/mysqld-relay-bin
relay-log = /var/lib/mysql/slave-relay.log
relay-log-index = /var/lib/mysql/slave-relay-log.index

ဒီေအာက္ကေတာ့ ဆာဗာ ၂ ရဲ႕ /etc/my.cnf  အထဲမွာ ထည့္မွာပါ